Prism公式サンプルのメモ
2017/07/21
| ブートストラッパーとシェル | ブートストラッパーとシェルの作成 |
| リージョン | リージョンの作成 |
| カスタムリージョンアダプター | StackPanel用のリージョンアダプターを作る |
| View Discovery | View Discoveryによってviewを自動的に注入する。 |
| View Injection | View Injectionを使って手動でviewを追加したり削除したりする。 |
| View Activation/Deactivation | viewを手動でアクティベートしたりディアクティベートする。 |
| Modules with App.config | App.config ファイルを使用してモジュールをロードする。 |
| Modules with Code | コードによってモジュールをロードする。 |
| Modules with Directory | ディレクトリ内のモジュールをロード。 |
| Modules loded manually | IModuleManagerを使って手動でモジュールをロードする。 |
| ViewModelLocator | ViewModelLocatorの利用 |
| ViewModelLocator - Change Convention | ViewModelLocatorのネーミング規約を変更する。 |
| ViewModelLocator - Custom Registrations | 特定のviewを手動で登録する。 |
| DelegateCommand | DelegateCommand と DelegateCommand<T>を使う。 |
| CompositeCommands | コンポジットコマンドを使って複数のコマンドを一つのコマンドとして呼び出す方法を学ぶ。(「全てを保存」ボタン) |
| IActiveAwareコマンド | アクティブな場合にのみ実行されるようコマンド(CompositeCommands)をIActiveAwareにする |
| Event Aggregator | IEventAggregatorを利用する |
| Event Aggregator - Filter Events | イベント(events)に登録する際、受け取るイベントを絞り込む |
| RegionContext | RegionContextを使ってネストしたリージョンにデータを渡す |
| Region Navigation | 基本的なリージョンナビゲーション(画面遷移)の実装方法 |
| Navigation Callback | ナビゲーションが完了した時に通知を受け取る |
| Navigation Participation | INavigationAwareを使ってViewやViewModelを画面遷移に加える方法を学ぶ |
| 既存Viewsへの遷移 | ナビゲーション時にviewのインスタンスをコントロールする(同じViewを再利用するか新規に作成するか) |
| Passing Parameters | View/ViewModelから別のView/ViewModelにパラメータを渡す |
| Confirm/cancel Navigation | IConfirmNavigationReqestインターフェイスを使って「確認」「取消」のナビゲーションを実装する |
| Viewの生存期間を制御する | IRegionMemberLifetimeを使ってメモリーからviewsを自動的に取り除く |
| Navigation Journal | Navigation Journalの使い方を学ぶ(「戻る」「進む」ボタン) |
| Interactivity - NotificationRequest | InteractionRequestを使ってポップアップを表示する方法を学ぶ |
| Interactivity - ConfirmationRequest | InteractionRequestを使って確認用ダイアログを表示する方法を学ぶ(「OK」「Cancel」ボタン) |
| Interactivity - Custom Content | InteractionRequestでダイアログに表示されるコンテンツをカスタマイズする |
| Interactivity - Custom Request | InteractionRequestで使うカスタムリクエストを作成する |
| Interactivity - InvokeCommandAction | イベントに応じてコマンドを呼び出す。 |
1-BootstrapperShell
BootstrapperとShellブートストラッパーとシェルの作成。Prism Template Packのテンプレートを使えば既に作成済みの部分。
(Prism用語的にはShellですが、実際のファイル名はMainWindowです。)
2-Regions
リージョン上の「1-BootstrapperShell」にregionを追加。
こちらもテンプレートで作成済み。
3-CustomRegions
Custom Region AdapterStackPanel用のregion adapterを作る。
最初から用意されている3つのregion adapterで足りず自作する時。
4-ViewDiscovery
View DiscoveryView Discoveryによってviewを自動的に注入する。
MainWindow.xaml.csのコンストラクタ内で
regionManager.RegisterViewWithRegion("ContentRegion",typeof(ViewA));
5-ViewInjection
View InjectionView Injectionを使って手動でviewを追加したり削除したりする。

ボタンをクリックするとViewAが表示されます。
private void Button_Click(object sender, RoutedEventArgs e)
{
    var view = _container.Resolve<ViewA>();
    IRegion region = _regionManager.Regions["ContentRegion"];
    region.Add(view);
}
6-ViewActivationDeactivation
View Activation/Deactivationviewを手動でアクティベートしたりディアクティベートする。
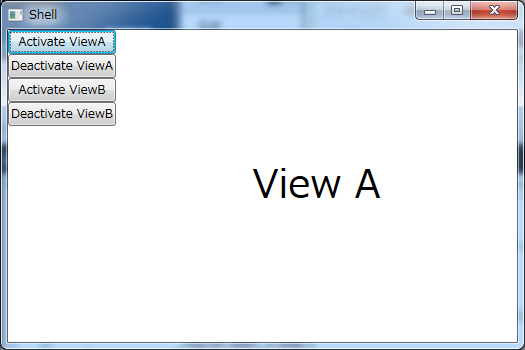
MainWindow_LoadedイベントでViewAとViewBは追加済み。
private void Button_Click(object sender, RoutedEventArgs e)
{
    //activate view a
    _region.Activate(_viewA);
}

private void Button_Click_1(object sender, RoutedEventArgs e)
{
    //deactivate view a
    _region.Deactivate(_viewA);
}
7-Modules
7-Modules - AppConfig
Modules with App.configApp.config ファイルを使用してモジュールをロードする。
<?xml version="1.0" encoding="utf-8"?>
<configuration>
  <configSections>
    <section name="modules" type="Prism.Modularity.ModulesConfigurationSection, Prism.Wpf" />
  </configSections>
  <startup>
  </startup>
  <modules>
    <module assemblyFile="ModuleA.dll" moduleType="ModuleA.ModuleAModule, ModuleA, Version=1.0.0.0, Culture=neutral, PublicKeyToken=null" moduleName="ModuleAModule" startupLoaded="True" />
  </modules>
</configuration>
7-Modules - Code
Modules with Codeコードによってモジュールをロードする。
Bootstrapper.cs内でカタログにモジュール追加。
protected override void ConfigureModuleCatalog()
{
    var catalog = (ModuleCatalog)ModuleCatalog;
    catalog.AddModule(typeof(ModuleAModule));
}
コードで追加するのはモジュール化のメリット無いように思えましたが、モジュール変更の際ソリューション丸ごとビルドし直す必要無くなりますね。7-Modules - Directory
Modules with Directoryディレクトリ内のモジュールをロード。
protected override IModuleCatalog CreateModuleCatalog()
{
  return new DirectoryModuleCatalog() { ModulePath = @".\Modules" };
}
7-Modules - LoadManual
Modules loded manuallyIModuleManagerを使って手動でモジュールをロードする。
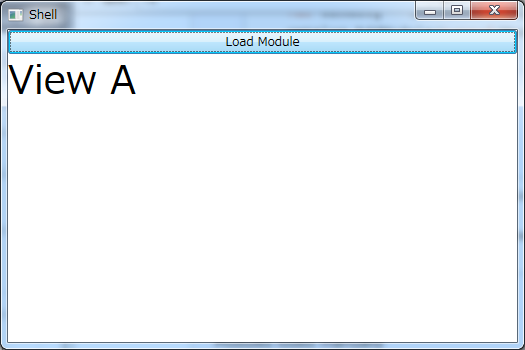
Bootstrapper.cs内でカタログに追加。
protected override void ConfigureModuleCatalog()
{
    var moduleAType = typeof(ModuleAModule);
    ModuleCatalog.AddModule(new ModuleInfo()
    {
        ModuleName = moduleAType.Name,
        ModuleType = moduleAType.AssemblyQualifiedName,
        InitializationMode = InitializationMode.OnDemand
    });
}
ロードはMainWindowのクリックイベントで。
private void Button_Click(object sender, RoutedEventArgs e)
{
   _moduleManager.LoadModule("ModuleAModule");
}
8-ViewModelLocator
ViewModelLocatorの利用Viewと対応するViewModelを紐付けるのに使われている規約(convention)。
同一アセンブリ内で、ViewはViews配下のネームスペースを持つ、View ModelはViewModels配下のネームスペースを持つ。View Modelの名前はViewと同じ名前の後ろにViewModelが付く。
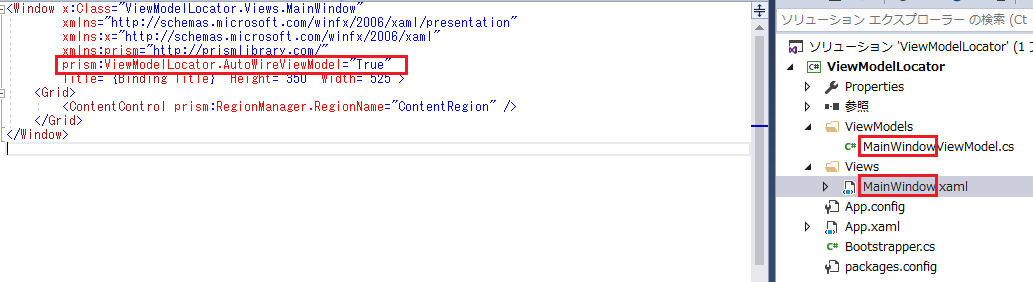
規約通りのフォルダ名とネーミングにしておけば勝手に紐付けてくれる。
9-ChangeConvention
ViewModelLocator - Change ConventionViewModelLocatorのネーミング規約を変更する。
Bootstrapper.cs内でConfigureViewModelLocatorを上書き。
protected override void ConfigureViewModelLocator()
{
  base.ConfigureViewModelLocator();
  ViewModelLocationProvider.SetDefaultViewTypeToViewModelTypeResolver((viewType) =>
  {
      var viewName = viewType.FullName;
      var viewAssemblyName = viewType.GetTypeInfo().Assembly.FullName;
      var viewModelName = $"{viewName}ViewModel, {viewAssemblyName}";
      return Type.GetType(viewModelName);
  });
}
同一フォルダ内(ネームスペースが同じ)でクラス名にViewModelが追加されたものを探す。10-CustomRegistrations
ViewModelLocator - Custom Registrations特定のviewを手動で登録する。
これもBootstrapper.cs内でConfigureViewModelLocatorを上書き。
protected override void ConfigureViewModelLocator()
{
  base.ConfigureViewModelLocator();

  // type / type
  //ViewModelLocationProvider.Register(typeof(MainWindow).ToString(), typeof(CustomViewModel));

  // type / factory
  //ViewModelLocationProvider.Register(typeof(MainWindow).ToString(), () => Container.Resolve<CustomViewModel>());

  // generic factory
  //ViewModelLocationProvider.Register<MainWindow>(() => Container.Resolve<CustomViewModel>());

  // generic type
  ViewModelLocationProvider.Register<MainWindow, CustomViewModel>();
}
11-UsingDelegateCommands
デリゲートコマンドDelegateCommand と
DelegateCommand<T>を使う。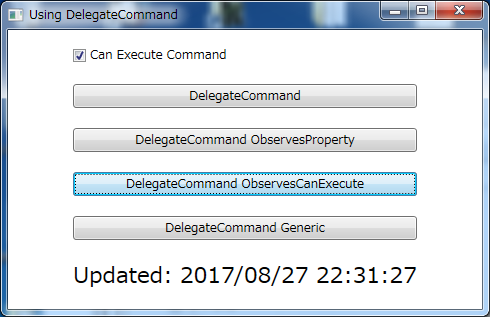
一番下の「DelegateCommand Generic」ボタンのみXAMLから受け取ったテキストを表示。上3つはいずれも現在時刻を表示。ボタンを活性化/非活性化するbool値の監視方法の書き方が違うだけで動きは同じようです。
CanExecuteはboolを返すメソッド、IsEnabledはプロパティ。
送信ボタン等、入力フォームをまとめてチェックする場合はメソッドの方が使いやすそう。
パラメータを受け取るDelegateCommand Genericの方はRegion NavigationではViewのパスを渡すのに使われています。
public MainWindowViewModel()
{
   ExecuteDelegateCommand = new DelegateCommand(Execute, CanExecute);

   DelegateCommandObservesProperty = new DelegateCommand(Execute, CanExecute).ObservesProperty(() => IsEnabled);

   DelegateCommandObservesCanExecute = new DelegateCommand(Execute).ObservesCanExecute((vm) => IsEnabled);

   ExecuteGenericDelegateCommand = new DelegateCommand<string>(ExecuteGeneric).ObservesCanExecute((vm) => IsEnabled);
}

private void Execute()
{
   UpdateText = $"Updated: {DateTime.Now}";
}

private void ExecuteGeneric(string parameter)
{
   UpdateText = parameter;
}
実際に使ってみました。12-UsingCompositeCommands
コンポジットコマンドCompositeCommandsを使って複数のコマンドを一つのコマンドとして呼び出す方法を学ぶ。

11のサンプルのボタンをタブ内に配置し、CompositeCommandsのボタンを付けた感じ。
一番上の「Save」ボタン(CompositeCommands)を押すと、全てのタブのボタン(DelegateCommand)が実行される(更新時刻が同時になってる)。
どれかのタブの「Can Execute」のチェックを外すと、CompositeCommandsは押せなくなる。サンプルのコードのどの部分で書かれているのかよく分からなかったので、ドキュメントを確認したら、CompositeCommands側で実装されていました。
CompositeCommandクラスはチャイルドコマンド(DelegateCommandインスタンス)のリストを保持します。CompositeCommandクラスのExecuteメソッドはチャイルドコマンドのExecuteメソッドを順番に呼び出すだけです。CanExecuteメソッドも同様にチャイルドコマンドのCanExecuteメソッドを呼び出しますが、チャイルドコマンドが一つでも実行できない場合はfalseを返します。言い換えればデフォルトでCompositeCommandはチャイルドコマンドが全て実行可能な場合にのみ実行できるようになっています。
13-IActiveAwareCommands
IActiveAware Commandsアクティブなコマンドのみ呼び出すようにcommands(CompositeCommands)をIActiveAwareにする
実行後の見た目は上と全く同じ。今度は全てのタブの「Can Execute」にチェックが付いていても現在表示されているタブのコマンドだけが実行される(タブの切り替えによってコマンドのIsActiveが切り替わるためアクティブでないタブのコマンドは実行されない)。
ViewModelでIActiveAwareを実装
public class TabViewModel : BindableBase, IActiveAware
{
…
  bool _isActive;
  public bool IsActive
  {
      get { return _isActive; }
      set
      {
          _isActive = value;
          OnIsActiveChanged();
      }
  }
  private void OnIsActiveChanged()
  {
      UpdateCommand.IsActive = IsActive;
      IsActiveChanged?.Invoke(this, new EventArgs());
  }

  public event EventHandler IsActiveChanged;
}
14-UsingEventAggregator
イベントアグリゲーターイベントアグリゲーターを利用する
モジュール間でイベントのpublish/subscribe機能を提供する。
(.NET Frameworkのeventsはモジュール内でのみ使い、モジュール間のやり取りはIEventAggregatorを使うこと。.NET Frameworkのeventsを使いunsubscribe忘れたりすると参照残ったままでガベージコレクトされずメモリリークに繋がることがある)
マルチキャストにも対応している(publisher:N、subscriber:N)。
詳しくはドキュメント参照。
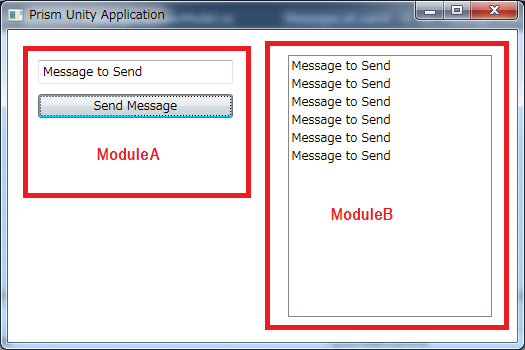
publisherとsubscriberを結びつけるのはPubSubEventクラス。
using Prism.Events;

namespace UsingEventAggregator.Core
{
    public class MessageSentEvent : PubSubEvent<string>
    {
    }
}
イベントのpublish(ModuleA側)_ea.GetEvent<MessageSentEvent>().Publish(Message);イベントへのsubscribe(ModuleB側)
_ea.GetEvent<MessageSentEvent>().Subscribe(MessageReceived);
15-FilteringEvents
イベントアグリゲーター - イベントのフィルターイベント(events)に登録する際、受け取るイベントを絞り込む
イベントへのsubscribe(ModuleB側)
_ea.GetEvent<MessageSentEvent>().Subscribe(MessageReceived, ThreadOption.PublisherThread, false, (filter) => filter.Contains("Brian"));
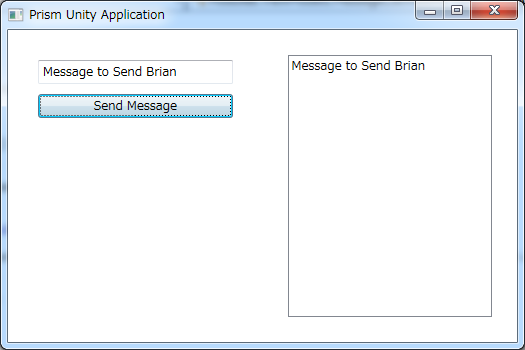
メッセージにBrianを付けないと一覧に表示されない。
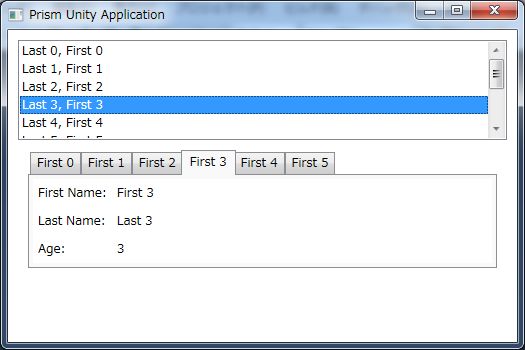
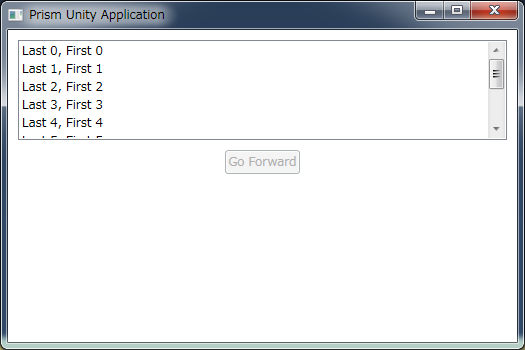
16-RegionContext
リージョンコンテキストRegionContextを使ってネストしたリージョンにデータを渡す
上に表示されている一覧のどれかをクリックすると、下にその詳細が表示される。よくあるmaster/detailのパターン。
外枠のContentRegionはMainWindowで定義され、内枠のPersonDetailsRegionはモジュール内のPersonList.xamlで定義されている(Regionってモジュール側でも使えるんですね)。
ドキュメントはこちら

親ViewのPersonListからそのリージョン内の子Viewにデータを渡すのにRegionContextを使う。
渡す側(PersonList.xaml)
<ListBox x:Name="_listOfPeople" ItemsSource="{Binding People}"/>
<ContentControl Grid.Row="1" Margin="10"
                        prism:RegionManager.RegionName="PersonDetailsRegion"
                        prism:RegionManager.RegionContext="{Binding SelectedItem, ElementName=_listOfPeople}"/>
受け取る側(PersonDetail.xaml.cs)
private void PersonDetail_PropertyChanged(object sender, System.ComponentModel.PropertyChangedEventArgs e)
{
    var context = (ObservableObject<object>)sender;
    var selectedPerson = (Person)context.Value;
    (DataContext as PersonDetailViewModel).SelectedPerson = selectedPerson;
}
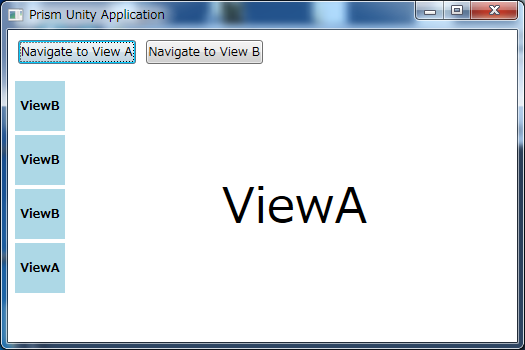
17-BasicRegionNavigation
Region Navigation基本的なリージョンナビゲーションの実装方法
view injectionやview discoveryを使わないURIベースのナビゲーション。Prism4.0から使えるようになった。
Viewを直接参照するかINavigateAsyncインターフェイスのRequestNavigateメソッドを使う。
ドキュメントはこちら
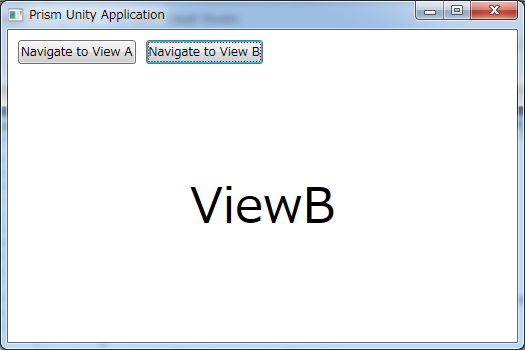
ボタンによってViewを切り替える。どちらのViewも同じモジュール内。
MainWindow.xaml
<DockPanel LastChildFill="True">
    <StackPanel Orientation="Horizontal" DockPanel.Dock="Top" Margin="5" >
        <Button Command="{Binding NavigateCommand}" CommandParameter="ViewA" Margin="5">Navigate to View A</Button>
        <Button Command="{Binding NavigateCommand}" CommandParameter="ViewB" Margin="5">Navigate to View B</Button>
    </StackPanel>
    <ContentControl prism:RegionManager.RegionName="ContentRegion" Margin="5"  />
</DockPanel>
MainWindowViewModel.cs
public DelegateCommand<string> NavigateCommand { get; private set; }

public MainWindowViewModel(IRegionManager regionManager)
{
    _regionManager = regionManager;

    NavigateCommand = new DelegateCommand<string>(Navigate);
}

private void Navigate(string navigatePath)
{
    if (navigatePath != null)
        _regionManager.RequestNavigate("ContentRegion", navigatePath);
}
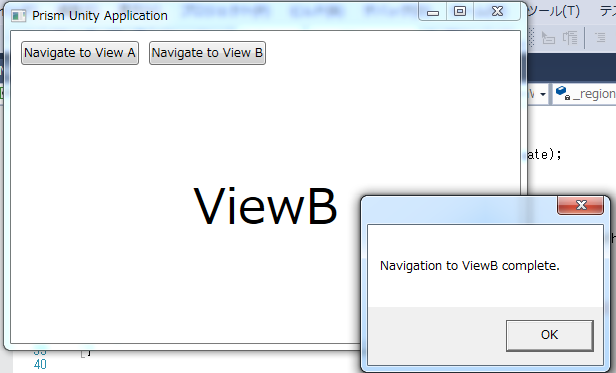
実際に使ってみました。18-NavigationCallback
ナビゲーションコールバックナビゲーションが完了した時に通知を受け取る
private void Navigate(string navigatePath)
{
    if (navigatePath != null)
        _regionManager.RequestNavigate("ContentRegion", navigatePath, NavigationComplete);
}

private void NavigationComplete(NavigationResult result)
{
    System.Windows.MessageBox.Show(String.Format("Navigation to {0} complete. ", result.Context.Uri));
}
RequestNavigateメソッドにナビゲーションが完了した時に呼ばれるコールバックメソッドあるいはデリゲートを指定できる。NavigationResultクラスにはナビゲーション操作に関するプロパティが定義されている。操作が成功した場合はResultプロパティがtrueになる。Resultがfalseの場合Errorプロパティが操作中に発生した例外への参照を渡してくれる。
詳しくはこちらの下の方
実際に使ってみました。
19-NavigationParticipation
Navigationへの参加INavigationAwareを使ってViewやViewModelをナビゲーションに参加させる方法を学ぶ
元々ボタンのみ表示。ボタンを押すとそれぞれのViewが表示され、押すたびにカウントアップ。画像を見てもよく分かりませんが、記憶の手がかりとして。
INavigationAware
public interface INavigationAware
{
    // ViewやViewModelがリクエストに応えられるかどうかを示す
    // 同じViewやViewModelを使いまわす時に利用
    // 20-NavigateToExistingViews参照
    bool IsNavigationTarget(NavigationContext navigationContext);

    // ナビゲーション前に実行される
    // 状態やデータの保存等、Viewが閉じられても大丈夫なようにしておくのに利用
    void OnNavigatedTo(NavigationContext navigationContext);

    // ナビゲーション完了後に実行される
    // 新しく表示されるViewにデータを渡すのに利用
    // 21-PassingParameters参照
    void OnNavigatedFrom(NavigationContext navigationContext);
}
ViewあるいはViewModelで実装。ViewModelの方が一般的。サンプルもViewModel側。コメント部分は自信なし。詳しくはドキュメント参照。
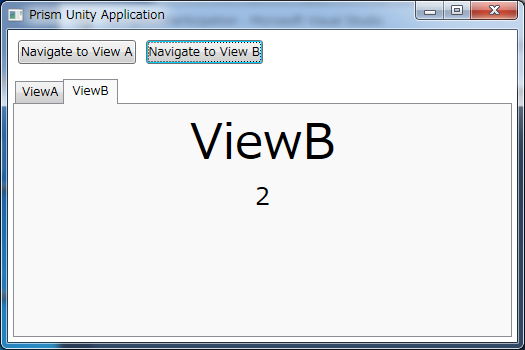
20-NavigateToExistingViews
既存のViewsへのナビゲーションナビゲーション時にviewのインスタンスをコントロールする

19のサンプルでは何度押しても同じタブでカウントアップしていましたが、3を超えると新たなタブが追加されます。
public bool IsNavigationTarget(NavigationContext navigationContext)
{
    return PageViews / 3 != 1;
}
IsNavigationTargetがfalseの時に新たなタブViewが追加されます。詳しくはこちら。
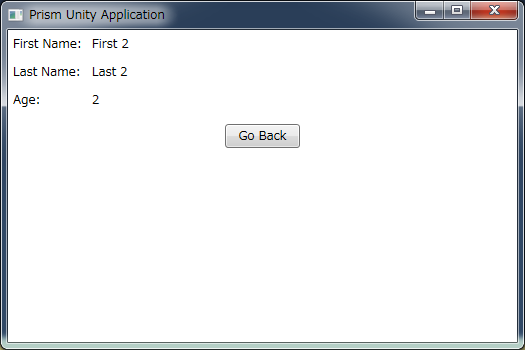
21-PassingParameters
パラメータを渡すView/ViewModelから別のView/ViewModelにパラメータを渡す
渡す側(PersonListViewModel.cs)
private void PersonSelected(Person person)
{
    var parameters = new NavigationParameters();
    // パラメータとしてIDだけでなくオブジェクト丸ごと渡すこともできる
    parameters.Add("person", person);

    if (person != null)
        _regionManager.RequestNavigate("PersonDetailsRegion", "PersonDetail", parameters);
}
受け取る側(PersonDetailViewModel.cs)
public void OnNavigatedTo(NavigationContext navigationContext)
{
    var person = navigationContext.Parameters["person"] as Person;
    if (person != null)
        SelectedPerson = person;
}

public bool IsNavigationTarget(NavigationContext navigationContext)
{
    // 一覧で選択されているのと同じLastNameのViewだとtrueになって再利用
    // 同じデータ(Person)を複数開かない→複数のPersonを同時に編集させる時に便利
    // IsNavigationTargetと言うネーミングがやっと理解できた…
    var person = navigationContext.Parameters["person"] as Person;
    if (person != null)
        return SelectedPerson != null && SelectedPerson.LastName == person.LastName;
    else
        return true;
}
サンプルのOnNavigatedFromでは使われていませんが、同様に使用可能です。詳しくはこちら。
22-ConfirmCancelNavigation
コンファーム/キャンセル ナビゲーションIConfirmNavigationReqestインターフェイスを使って「確認」「取消」のナビゲーションを実装する
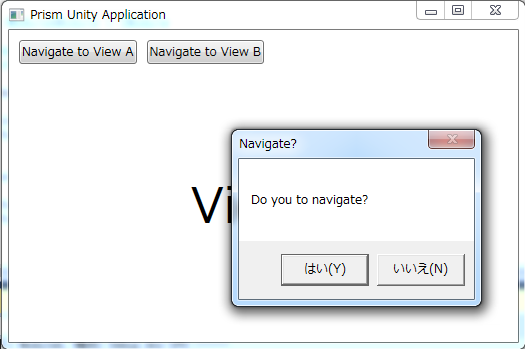
public class ViewAViewModel : BindableBase, IConfirmNavigationRequest
{
    public ViewAViewModel()
    {
    }

    public void ConfirmNavigationRequest(NavigationContext navigationContext, Action<bool> continuationCallback)
    {
        bool result = true;

        if (MessageBox.Show("Do you to navigate?", "Navigate?", MessageBoxButton.YesNo) == MessageBoxResult.No)
            result = false;

        continuationCallback(result);
    }

    public bool IsNavigationTarget(NavigationContext navigationContext)
    {
    …
}
IConfirmNavigationRequestはINavigationAwareにConfirmNavigationRequestを追加したもの。ドキュメントはこちら。
23-RegionMemberLifetime
Viewの生存期間をコントロールするIRegionMemberLifetimeを使ってメモリーからviewsを自動的に取り除く
ViewBは次のボタンが押されても残るがViewAは消える。違いはViewAのViewModelがIRegionMemberLifetimeを実装してKeepAliveをfalseにしている。
public class ViewAViewModel : BindableBase, INavigationAware, IRegionMemberLifetime
{
    public ViewAViewModel()
    {
    }
    public bool KeepAlive
    {
        get
        {
            return false;
        }
    }
…
}
24-NavigationJournal
Navigation JournalNavigation Journalの使い方を学ぶ
最初はボタンが押せない状態。
どれかを選択すると詳細へ。
戻るとボタンが押せるように。押すと同じ詳細へ。
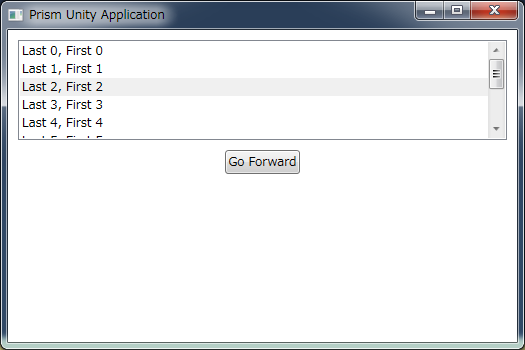
詳しくはこちら。
25-NotificationRequest
インタラクティビティ - NotificationRequestInteractionRequestを使ってポップアップを表示する方法を学ぶ。
オブザーバーパターンの一種だそうです。
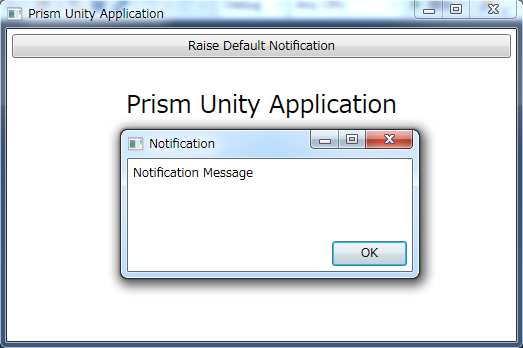
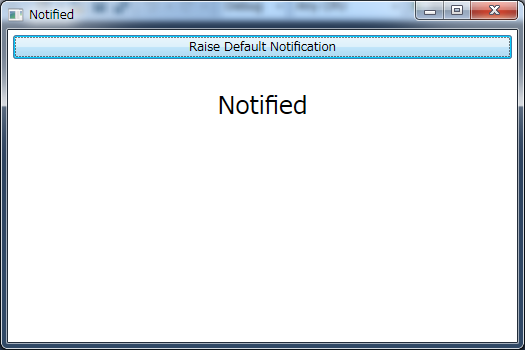
Prism.Interactivity.InteractionRequestのInteractionRequest
public MainWindowViewModel()
{
    NotificationRequest = new InteractionRequest<INotification>();
    NotificationCommand = new DelegateCommand(RaiseNotification);
}

void RaiseNotification()
{
    NotificationRequest.Raise(new Notification { Content = "Notification Message", Title = "Notification" }, r => Title = "Notified");
}
26-ConfirmationRequest
インタラクティビティ - ConfirmationRequestInteractionRequestを使って確認用ダイアログを表示する方法を学ぶ
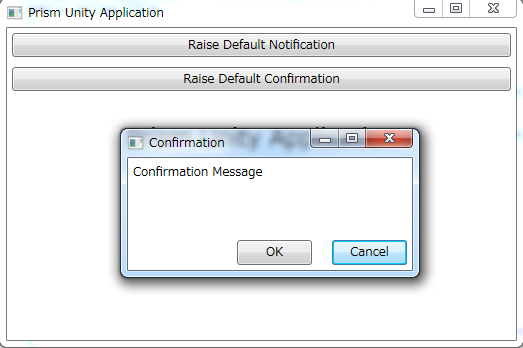
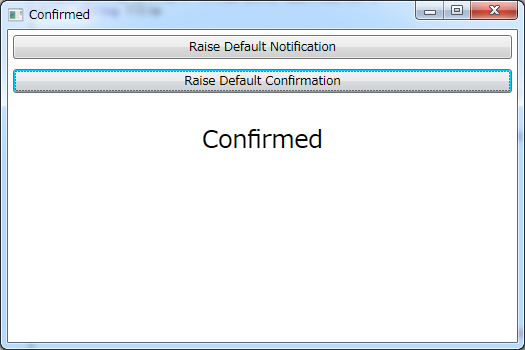
public MainWindowViewModel()
{
    …
    ConfirmationRequest = new InteractionRequest<IConfirmation>();
    ConfirmationCommand = new DelegateCommand(RaiseConfirmation);
}
…
void RaiseConfirmation()
{
    ConfirmationRequest.Raise(new Confirmation {
        Title = "Confirmation",
        Content = "Confirmation Message" },
        r => Title = r.Confirmed ? "Confirmed" : "Not Confirmed");
}
27-CustomContent
インタラクティビティ - カスタムコンテントInteractionRequestでダイアログに表示されるコンテンツをカスタマイズする
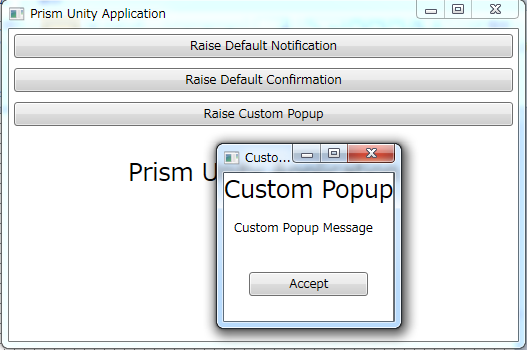
ViewModel側は25とほぼ同じ。
ポップアップ画面のUserControlを作って、
<StackPanel>
    <TextBlock Text="{Binding Title}" FontSize="24" HorizontalAlignment="Center" />
    <TextBlock Text="{Binding Content}" Margin="10"/>
    <Button Margin="25" Click="Button_Click">Accept</Button>
</StackPanel>
MainWindowから呼び出す
<prism:InteractionRequestTrigger SourceObject="{Binding CustomPopupRequest}">
    <prism:PopupWindowAction IsModal="True" CenterOverAssociatedObject="True">
        <prism:PopupWindowAction.WindowContent>
            <views:CustomPopupView />
        </prism:PopupWindowAction.WindowContent>
    </prism:PopupWindowAction>
</prism:InteractionRequestTrigger>
実際に使ってみました。28-CustomRequest
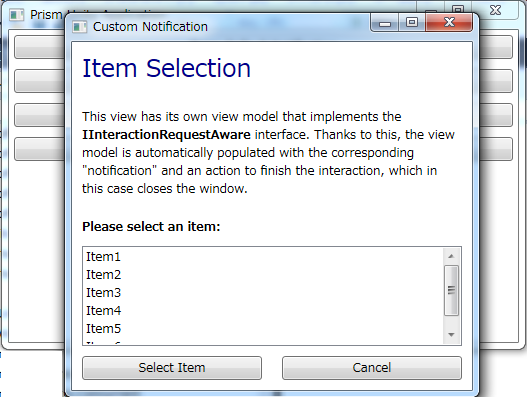
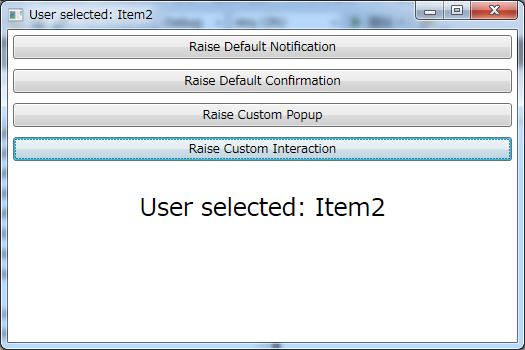
インタラクティビティ - Custom RequestInteractionRequestで使うカスタムリクエストを作成する
リストからの選択を促すダイアログ
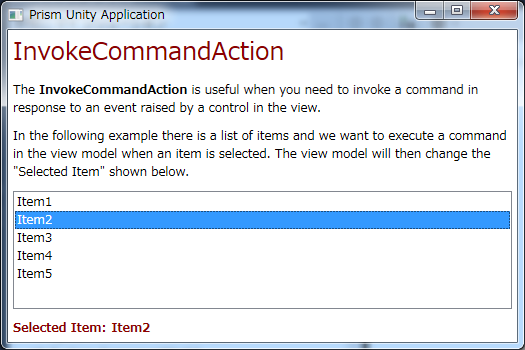
29-InvokeCommandAction
インタラクティビティ - InvokeCommandActionイベントに応じてコマンドを呼び出す。